Ever been caught in a sudden downpour miles from your car? Or maybe you’ve taken a wrong turn on a hiking trail and felt that first pang of panic? Life throws curveballs, and knowing how to handle them in the wild can mean the difference between a scary story to tell later or a real emergency.
Whether you’re a weekend camper or serious backpacker, basic survival skills aren’t just nice to have, they’re must-haves.
Did you know that most wilderness rescues happen because folks lack just a handful of key survival skills? It’s true. The good news is that these skills aren’t rocket science. They’re practical abilities that anyone can learn with a bit of practice.
In this guide, I’ll walk you through the five most critical survival skills every outdoor enthusiast should master: shelter building, fire making, water finding, first aid basics, and signaling for help.
These aren’t just tips, they’re life-savers.
I’ve spent years teaching these techniques to everyone from Scout troops to military personnel. My goal is simple: help you feel confident in any outdoor situation. Let’s get started.
Key Takeaways
- The five most critical survival skills are shelter building, fire making, water finding, first aid, and signaling for help.
- Shelter protects you from exposure, which can kill faster than thirst or hunger in harsh weather conditions.
- When finding water, look for clear running streams, rainwater, or plants like cattails and willows that signal water nearby.
- For first aid, stop bleeding first by applying direct pressure for at least 10-15 minutes, which gives blood time to clot.
- Three fires arranged in a triangle pattern serve as a universal distress signal that search teams recognize from above.
The Importance of Survival Skills
Survival skills aren’t just for hardcore outdoorsmen or doomsday preppers. These skills can save your life when things go south. I once got lost on a day hike with my kids, and basic knowledge of direction finding got us back to our car before dark.
The five most vital skills include first aid, water safety, shelter building, fire starting, and signaling for help. These basics form the backbone of staying alive in tough spots.
Survival isn’t about fancy gear. It’s about having the right skills between your ears.
Learning these skills builds confidence and keeps panic at bay when facing the unknown. Mountain athletes and weekend hikers alike need to master shelter building and water purification.
During my years teaching wilderness classes, I’ve seen how these skills turn scared folks into calm problem solvers. The eight basic survival rules start with staying calm and making a plan, then move to finding shelter and water.
These aren’t just nice-to-have skills – they’re must-knows for anyone who steps into the wild.
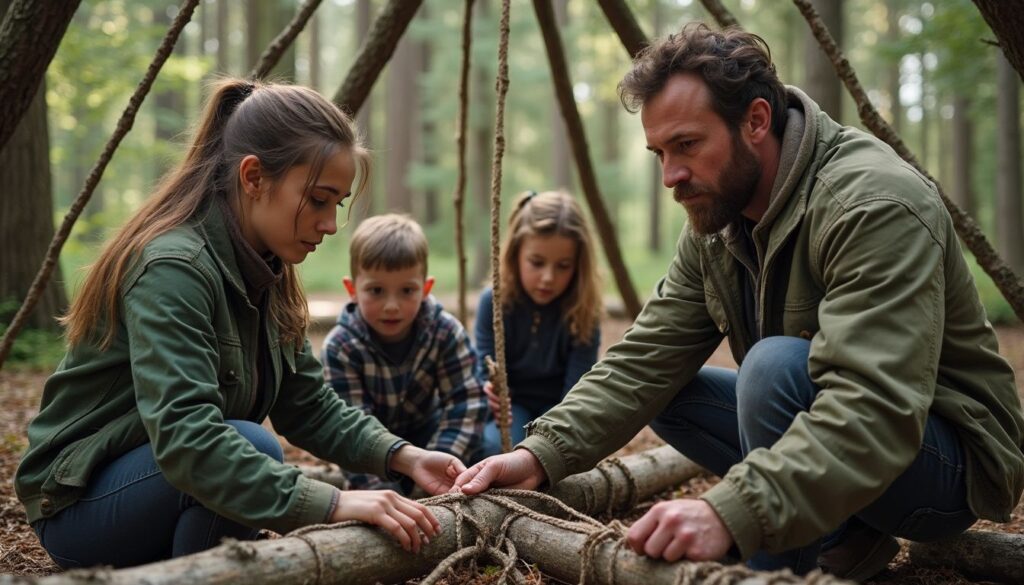
Shelter Building
A good shelter can save your life when the weather turns bad. You need to know how to build one fast using what’s around you – branches, leaves, and maybe a tarp from your pack.
Finding a Suitable Location
Picking the right spot for your shelter can make or break your survival chances. Look for high ground that stays dry during rain but sits below ridgelines to avoid harsh winds. I always tell my kids, “Never camp in valleys or dry creek beds,” since these spots can flood fast during storms.
Trees offer natural protection, but watch out for dead branches that might fall during windy weather. These “widow makers” have crushed many shelters in survival situations. Your ideal location should be close to water but not so close that insects become a problem.
Safety comes first in shelter location. Check for animal trails, insect nests, and poisonous plants before settling down. I once built a perfect lean-to shelter, only to discover I’d set up shop right on an ant highway! The ground should be relatively flat for comfortable sleep, which helps maintain your mental sharpness.
Mountain athletes and survival experts agree that shelter building ranks among the top five survival skills because it protects you from exposure, which can kill faster than thirst or hunger in harsh conditions.
Using Natural Materials
Natural items from the woods can save your life in a tough spot. I’ve taught my kids to spot useful materials on our camping trips, and now they can build shelters faster than I can!
- Fallen branches make great shelter frames. Look for sturdy limbs about wrist-thick for your main support beams.
- Large leaves like maple or oak can be layered like shingles to keep rain out. Overlap them from bottom to top so water runs off instead of in.
- Pine needles create excellent bedding that insulates you from the cold ground. Gather a pile at least 6 inches thick for proper warmth.
- Moss works as natural rope when twisted together. I once secured an entire lean-to with just moss cordage during a sudden storm.
- Rocks hold heat from your fire for hours. Place fist-sized stones near your flames, then move them to your sleeping area for nighttime warmth.
- Clay soil mixed with water forms a waterproof sealant for shelter gaps. Apply it to cracks where wind might blow through.
- Tree bark, especially from birch trees, peels off in sheets perfect for roofing material. The natural oils make it somewhat water-resistant.
- Grass bundles tied together create thick insulation layers. Stack them against your shelter walls to block wind.
- Vines can be used as flexible binding material. Grape vines and kudzu are particularly strong for lashing shelter parts together.
- Cattail fluff makes excellent fire tinder and insulation. The fluffy seed heads catch sparks easily and burn hot enough to start larger kindling.
Fire Building and Maintenance
Fire can save your life in the wild when night falls and temperatures drop. You’ll need to master both making flames from scratch and keeping them alive through wind and rain.
Starting a Fire Without Tools
Making fire without modern tools is a key survival skill that can save your life in the wild. Let’s look at some ways to create flames when you don’t have matches or lighters handy.
- The hand drill method uses friction between two pieces of wood. Spin a straight stick against a flat piece of wood until you create hot dust that turns into an ember.
- Bow drill techniques work faster than hand drills. You’ll need a bow (curved stick with string), spindle, fireboard, and socket to create the needed friction.
- Fire plows require less parts but more effort. Simply rub a stick back and forth in a groove on a flat board until heat builds up.
- Flint and steel creates sparks when struck together. Look for quartz rocks to strike against high-carbon steel like a knife blade.
- Sunlight through glass can focus rays to ignite tinder. Eyeglasses, magnifying glasses, or even a clear water bottle can work on sunny days.
- Two rocks struck together might create sparks if you find the right types. Quartz against iron-rich rocks works best for this method.
- Batteries and steel wool make fire easily. Touch both ends of a battery to fine steel wool and it will glow hot enough to light your tinder.
- Ice can be shaped into a lens on clear days to focus sunlight. This takes skill but works in cold environments with good sun.
Now that you know how to start fires without tools, let’s explore how to gather and manage firewood to keep that precious flame alive.
Gathering and Managing Firewood
Now that you know how to start a fire with nothing but sticks and stones, let’s talk about keeping that flame alive. Good firewood makes the difference between a cozy night and a cold, dark one in the wild.
- Look for dry, dead wood that snaps easily. Wet wood creates more smoke than heat and wastes your energy trying to burn it.
- Collect three types of wood: tinder (small twigs, dry leaves), kindling (finger-thick sticks), and fuel wood (wrist-thick branches).
- Test branches by bending them. If they bend without breaking, they’re too green and won’t burn well.
- Gather twice as much firewood as you think you’ll need. I once spent a freezing night in the mountains because I underestimated how quickly wood burns.
- Store your firewood under a tarp or natural shelter to keep it dry during rain or snow.
- Break longer branches against trees or rocks instead of using a knife. This saves your energy and tools.
- Avoid wood from pine or spruce trees for cooking fires. These contain sap that creates lots of smoke and can make food taste bad.
- Search for standing dead trees rather than logs on the ground. Ground logs often hold moisture and may house insects.
- Stack your firewood in a way that allows air to flow between pieces. This helps it dry faster if slightly damp.
- Keep a small pile of tinder and kindling near your fire for quick refueling. This basic survival skill saves time during cold nights.
- Use thicker logs for overnight fires. They burn slower and maintain heat while you sleep.
- Clear the area around your fire pit of leaves and other flammable materials. Fire safety remains critical even in survival situations.
Food and Water Procurement
Finding food and water ranks as your top priority in any survival situation. You’ll need to spot safe water sources fast and know which plants won’t poison you when your stomach starts growling.
Identifying Safe Water Sources
Finding clean water ranks as the top priority in any survival situation. Your body needs water more than food, and drinking from bad sources can make you very sick.
- Clear running streams offer the safest natural water option in the wild. I once drank from a mountain stream after checking it flowed fast over rocks, which helps clean the water naturally.
- Rainwater collection provides a direct source of relatively clean water. Catch it using tarps, large leaves, or any container during rainfall.
- Morning dew can be collected by tying clean cloth around your ankles and walking through tall grass before sunrise. Wring the cloth into a container when it gets wet.
- Snow and ice make good water sources but must be melted first. Eating snow directly can lower your body temperature and waste energy.
- Springs bubbling from the ground usually contain clean water since it has been filtered through soil and rock layers.
- Look for water-indicating plants like cattails, willows, and cottonwoods that grow near water sources. These plants signal water might be close by.
- Avoid water with strange colors, foam, or bad smells. These signs often point to pollution or harmful bacteria.
- Water near animal tracks might be unsafe due to contamination from waste. Check for signs of animal activity before drinking.
- Stagnant pools often harbor bacteria and parasites. Skip these unless you have no other choice and can purify the water.
- Water purification tablets should be part of your survival kit for emergency situations. They kill most harmful organisms in about 30 minutes.
Foraging for Edible Plants
Knowing which plants you can eat might save your life in the woods. Wild foods can keep you going when your trail mix runs out.
- Learn to spot common edible plants like dandelions, blackberries, and pine needles before your trip. The leaves, flowers, and roots of dandelions are all safe to eat and packed with vitamins.
- Always test new plants with the Universal Edibility Test if you’re unsure. Rub a small piece on your skin, then lips, then tongue, waiting for reactions before eating a tiny bit.
- Avoid plants with milky sap, shiny leaves, or beans in pods as these often signal danger. Many toxic plants share these features, so stick to what you know for sure.
- Look for nuts and berries in fall months as they offer high caloric value. Acorns need soaking to remove bitter tannins, but they make filling food in tough spots.
- Pine trees offer edible inner bark and vitamin C-rich needles for tea. The white inner bark can be dried and ground into flour in a pinch.
- Cattails are known as the “supermarket of the swamp” with edible parts year-round. The roots contain starch you can pound into flour, while spring shoots taste like cucumber.
- Bring a pocket guide with color photos to help with plant ID in the field. Books beat phone apps since batteries die but paper works without power.
- Try eating small amounts of wild plants at first to avoid stomach upset. Your body needs time to adjust to these new food sources.
- Focus on plants that grow in abundance rather than rare finds. This practice helps protect the local plant population and gives you more food.
- Study plants in your local area before an emergency happens. Wilderness survival training often includes plant identification as a basic survival skill.
Basic First Aid
Knowing basic first aid can save a life when you’re miles from help. You’ll need to learn how to stop bleeding, treat burns, and handle broken bones with items from your kit or found in nature.
Treating Injuries in the Wild
Injuries happen fast in the wilderness, and help might be hours or days away. Knowing basic first aid can mean the difference between a scary story to tell later or a true disaster.
- Stop any bleeding first by applying direct pressure with a clean cloth. Press firmly on the wound for at least 10 minutes without peeking, as this gives blood time to clot.
- Clean all wounds with the cleanest water you have. Boiling water for at least one minute kills most harmful germs that cause infection.
- Close small cuts with butterfly bandages made from tape, or use super glue in a pinch. This wilderness first aid trick works great for cuts that aren’t too deep.
- Treat burns by cooling the area with clean water for several minutes. Never use ice directly on burns, as this can damage tissue further.
- Immobilize sprains or breaks using sticks, trekking poles, or other straight items as splints. Secure them with strips of clothing or cord.
- Address snake bites by keeping the victim calm and the bite area below heart level. Don’t cut the wound, suck out venom, or apply a tourniquet, as these old methods cause more harm.
- Handle blisters by leaving them intact if possible. The fluid inside protects against infection, but if they pop, clean the area and cover with a bandage.
- Treat hypothermia by getting the person into dry clothes and a warm shelter. Body-to-body heat works well in survival situations.
- Combat heat exhaustion by moving to shade, drinking water slowly, and cooling the body with damp cloths on the neck and wrists.
- Create a sling for arm injuries using a bandana, shirt, or other cloth. This limits movement and reduces pain during your trek to safety.
Now let’s talk about managing trauma and bleeding, which can be the most urgent survival challenge you’ll face in the backcountry.
Managing Trauma and Bleeding
Trauma and bleeding need quick action in the wild. Knowing basic first aid can mean the difference between life and death when you’re far from help.
- Stop the bleeding fast by pressing firmly on the wound with a clean cloth or bandage.
- Raise the injured area above heart level to slow blood flow if possible.
- Apply direct pressure for at least 15 minutes without checking the wound, as this helps blood clots form.
- Clean the wound with purified water once bleeding slows to prevent infection.
- Use butterfly bandages or strips of clean cloth to close small cuts.
- Make a tourniquet from a belt or bandana only as a last resort for severe limb bleeding that won’t stop.
- Watch for signs of shock like pale skin, rapid breathing, and confusion.
- Keep the person warm and calm while waiting for help.
- Carry basic first aid supplies including gauze, bandages, and antiseptic in your survival kit.
- Learn CPR and basic life support skills before heading into remote areas.
- Treat puncture wounds by allowing them to bleed briefly to flush out germs.
- Know how to handle snakebites by keeping the bite below heart level and getting medical help.
- Address insect stings by removing the stinger and watching for allergic reactions.
- Stay calm during a medical emergency, as panic makes things worse.
Signaling for Help
Getting spotted by rescuers can make the difference between life and death in a crisis. Smart survivors use both fire signals during the day (smoke) and night (flames), plus they flash mirrors at passing aircraft to catch attention from miles away.
Fire and Smoke Signals
Signaling for help ranks among the top five survival skills you must know. I’ve used these methods myself during camping trips gone wrong, and they can truly save your life when you’re stuck in the wild.
- Three fires in a triangle pattern serve as a global distress signal that search and rescue teams will spot from above.
- Smoke signals work best during daylight hours, with white smoke showing up against dark backgrounds and dark smoke against light skies.
- Green leaves, pine needles, or wet vegetation added to a hot fire create thick white smoke that travels high into the air.
- Rubber materials like tires or plastic will make black smoke, but use these only in true emergencies due to toxic fumes.
- The “SOS” signal (three short, three long, three short) can be made with smoke puffs by covering your fire with a blanket and removing it in the right pattern.
- Signal mirrors flash light up to 10 miles away on sunny days, making them more effective than smoke in some conditions.
- Bright clothing laid out in an X shape on open ground creates a visual signal that aircraft can spot.
- Timing matters for signals, so plan to make smoke during times when aircraft might be flying overhead.
- Fire signals at night should be placed in open areas away from trees that might block their visibility from above.
- A whistle blast pattern of three short bursts repeated at regular intervals tells others you need help.
Using Mirrors or Reflective Tools
While smoke signals work great during daylight, reflective tools shine when the sun is out. Mirrors and shiny objects can send light signals for miles, making them top tools in your survival kit.
- A signal mirror is one of the best tools for getting help in the wild. The flash can be seen up to 10 miles away on a clear day.
- Common items like watches, belt buckles, and soda cans can work as backup reflectors if you don’t have a signal mirror.
- Aim your mirror by holding it close to your face and looking through the sighting hole at your target.
- Flash three times in a row, pause, then repeat. This pattern is the universal distress signal that search and rescue teams know to look for.
- Metal foil from candy bars or gum wrappers can be smoothed out and used as makeshift reflectors in a pinch.
- CDs and DVDs have highly reflective surfaces that work great for signaling aircraft or distant search parties.
- Position yourself on high ground to increase your chances of being spotted when using reflective signals.
- Practice makes perfect with mirror signals. I once spent an afternoon with my kids learning this skill, and they spotted my signals from over a mile away.
- Reflective survival blankets can be hung in trees to catch sunlight and create large visible signals.
- Water in a clear plastic bag or bottle can amplify sunlight and create a stronger flash signal.
Mental Preparedness for Survival
Your brain is your best survival tool in the wild. The eight basic survival rules start with staying calm, and that’s no accident. Panic clouds judgment and wastes energy you can’t afford to lose.
I’ve seen tough guys fall apart while smaller, mentally tough folks thrive in crisis. Your mind needs training just like your body does. Think of emotional resilience as a muscle that grows stronger with practice.
In survival situations, your ability to keep a clear head often makes the difference between life and death.
Mental toughness means facing adversity without breaking down. You must accept your situation, make a solid plan, and stick to it. The wilderness doesn’t care about your feelings, but it will respect your decisions if they’re smart.
Many folks forget that survival is mostly about attitude. You can have all the gear and skills in the world, but a bad mindset will sink you fast. Practice positive self-talk and visualization before you need these skills in real life.
Basic survival skills require both physical practice and mental preparation to become second nature when facing emergency situations. Now let’s wrap up with some final thoughts on these critical survival skills.
Conclusion
Mastering survival skills can mean the difference between life and death in the wild. These five core skills, shelter building, fire making, water finding, first aid, and signaling for help, form the backbone of any survival plan.
Practice them often, even during casual hikes or camping trips.
Dr. Marcus Thornton, with over 25 years of wilderness rescue experience and author of three survival manuals, offers his expert take: “The five survival skills outlined here aren’t just nice-to-have tricks.
They’re must-know basics that work together as a system. Each skill supports the others, creating a safety net in emergency situations.”.
Dr. Thornton points out that these skills are backed by solid science. “Fire making isn’t just for warmth. It kills harmful bacteria in water, signals rescuers, and boosts mental health through its comfort factor.
The psychology of survival is just as vital as the physical skills.”.
On safety matters, Dr. Thornton stresses proper training. “Many survival schools offer weekend courses that teach these skills in a safe setting. The Red Cross and similar groups provide first aid training that meets national standards.
Always practice these skills before you need them in a real crisis.”.
For daily use, Dr. Thornton suggests simple ways to build these skills: “Set up a tarp shelter in your backyard. Learn to start a fire with matches before trying friction methods. Carry a basic first aid kit on every outing.
Small steps build big skills.”.
The benefits of these skills extend beyond survival. “These abilities build confidence and connect you with nature,” notes Dr. Thornton. “The downside is they require regular practice.
Skills fade without use. The upside far outweighs this small drawback.”.
Dr. Thornton’s final advice is clear: “Learn these five skills now, not when trouble starts. They work in almost any setting, from deserts to mountains. The time you spend learning them might save your life or someone else’s.
That makes them worth every minute of practice.
FAQs
1. What are the five most important survival skills everyone should know?
The five most important survival skills are water purification, shelter building, fire starting, wilderness first aid, and finding food through foraging. These basic survival skills can save your life in tough spots.
2. How do I purify water in the wild?
You can purify water by boiling it for at least one minute. Other methods include solar disinfection, using water filters, or adding purification tablets. Clean water is key to staying alive in any survival situation.
3. What’s the easiest shelter to build with limited supplies?
A lean-to shelter is quick to make with branches and a tarp. You can also dig a trench if you’re in snow, or use natural features like rock overhangs. Good shelter protects you from weather and keeps your body heat from escaping.
4. Why is fire making considered a critical survival skill?
Fire provides warmth, helps purify water, cooks food, and can signal for help. You can start fires using flint and steel, friction fire methods, or even a magnifying glass on sunny days. Signal fires with green leaves make smoke that search and rescue teams can spot from far away.
5. What should be in a basic first aid kit for wilderness survival?
A good first aid kit should have bandages for cuts, antiseptic wipes, pain relievers, and tools to remove splinters. The American Red Cross recommends also packing medicine for allergic reactions and knowledge of CPR for cardiac emergencies. Even a small kit can make a big difference when you’re far from help.
6. How can I improve my situational awareness in the outdoors?
Pay attention to your surroundings by noting landmarks, listening to nature sounds, and watching for animal behavior changes. Practice skills like navigation with compasses and maps before you need them. Many outdoor deaths happen because people don’t notice danger signs until it’s too late.


